
 By Merlin Carr RM2 (1949 - 1952) By Merlin Carr RM2 (1949 - 1952) 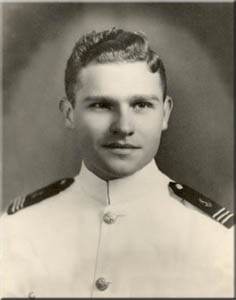 In 1936 he attended Purdue University, leaving there after two years on obtaining a slot at the Naval Academy. When war commenced December 7, 1941, his class graduated early, on December 19th. In January 1942 he boarded the USS Atlanta as now Ens. Donald H. Spangler. In October 1942 he was promoted to Lt.(JG) Donald H. Spangler. His duties were as the traffic officer. The communications center was just below the bridge where at least 30 shells struck early in the engagement that killed almost everyone in the bridge/superstructure area and where he lost his life. His younger brother Robert was in the Merchant Marines and had completed all of his Merchant Marine Academy training, and upon learning of his older brothers death, requested transfer to the US Navy The small town of Albion honors its two fallen heroes: Donald Spangler and Ed McGinley (A soldier lost in action while serving in France.) They named their Veterans of Foreign War post, the Spangler-McGinley Post 6413 in their honor. A number of Naval Battles that took place after Pearl Harbor, involving a smaller number of ships and for the most part, the Allies came out on the short end of the stick. We learned a number of lessons from these engagements but getting our Naval personnel to understand them and learn to deal with them was more difficult. The two most important lesson were: The Japanese had superior torpedoes that could be fired at a much greater distance than ever thought possible. And, they were great night fighters, with extreme accuracy of their guns. This was something they practiced often during the 20-30's. We were to feel the effects of these two capabilities over the next series of sea battles of ship vs ship, to our detriment. Where the U.S. star shined brightest was in the air. Our carriers were first rate. The planes may have been sub-par, but our tactical use of them was superior. The other intangible measure of our abilities laid with the men. From top to bottom, they had dedication, enthusiasm, aggressiveness in every situation, sense of purpose and a "never give up" attitude and last but not the least, individual initiative. This was apparent from Pearl Harbor right through to the very end of WWII, it continues even to today. The first major Naval Battle took place in the Coral Sea Japan, after Pearl Harbor, knew they had only a short time to capture strategic territory, especially oil, before the United States could even begin to blunt their goals. One of their goals was to cut off the supply line to Australia, or to make the distant too great to be effective while they consolidated their position. To that end, they needed to capture New Guinea, then move to the east and capture the islands to the east as far as the Fiji Islands. New Guinea was first. To that end, Japan planned an invasion of troops behind the Allied lines on the south and eastern tip of New Guinea. The Japanese Navy was to transport these invasion troops to accomplish that end. Ahead of this invasion force were the Japanese Naval forces that clashed with our Naval Forces. It was the first time a Naval battle took place where it was a Naval Air Battle and not a shot was fired by at a ship on either side . It was all Naval Air Combat. We lost ships we needed badly. The end result, though, was that Japan turned their invasion forces back. It gave the Allies time to defend their position on New Guinea and go on the offense. Battle number two, was the battle for Midway. Again it was a battle of the Japanese Naval Air Force against our Naval and Army Air Force. We caught them by surprise and defeated them. Japan turned their invasion forces around again. Japan still had sufficient forces to cut the supply line from the U.S. to Australia by moving further east. The planners of the Navy and the Joint Chief of Staff's in Washington as well as Admiral Nimitz knew of this. With limited forces the Allies moved into the island to the east, Noumea, and the Santa Cruz Island and others as well. Japan moved onto an Island called Guadalcanal and Florida Island (Tulagi Harbor)for a sea plane and support base. When everyone discovered this, they knew for certain that Japan was poised to cut the supply line to Australia. The Allies had to stop them. The decision was quickly made to attack Guadalcanal and Tulagi. The 1st Marine Division was already en-route to New Zealand for training and future operations. One regiment was scattered through out the islands for their security. That left only two regiments available for the attack. Which they did August 1942. They caught the Japanese flatfooted and quickly consolidated their hold around the unfinished airfield they renamed Henderson Field. It was the only thing they could do with the troops they had available. Japan countered through August, September and October by landing material and men down "the slot"as it became known, on DD's and barges, mainly at night. They also sent bombers and ships to bombard the airfield and the defenders around the perimeter at night. The struggle for Guadalcanal is interesting reading by itself. Through intelligence reports early in November, it became known that Japan was going to make their greatest attempt to recapture Guadalcanal. They were going to send down a strong Naval Force with a number of supply ships carrying over 7,000 troops to accomplish the task of recapturing the island.
To soften up the area, Naval fighting ships were sent down the slot to pound the area with their big guns. The area around Savo Island became known as Iron Bottom Sound. We now come to the last big thrust during the month of November. There were five major sea battles fought during November. A major Naval battle was fought near Santa Cruz Island on the 25-27 October, which started the afair. November 12-13-14 battles were pivotal as Japan was sending troops and supplies to their beleaguered army on Guadalcanal. Vice Admiral Halsey was now the overall commander and under him was Admiral Turner. Admiral Turner's force included 7 transports of Marine and Army troopers and supply's, plus 8 destroyers (DD's), 3 light cruisers (CL'a) and 2 heavy cruisers (CA's), along with two Rear Admirals, Callaghan and Scott. Forewarned, Admiral Turner, after unloading the troopers and 90% of the cargo on November 12th, detached the fighting ships to meet the on coming Japanese expected some time in the night. Left in command of the fighting force was Rear Admiral Callaghan aboard the heavy cruiser San Francisco, Admiral Scott had his flag aboard the light cruiser Atlanta. Admiral Callaghan placed his ships in the following order. Destroyers Cushing, Laffey, Sharett, O'Bannon, CL Atlanta, CA's San Francisco, Portland, CL's Helena, Juneau, DD's Aaron Ward, Barton, Monsson and bringing up the tail was the Fletcher. These ships, in column, circled Savo Island clockwise. Five of the ships had radar, only the O'Bannon, the fourth ship in the front was so equipped with the new SG . Of the cruisers, the Helena had the new SG Radar. The Atlanta had only elementary radar, which in this case was useless. The San Francisco, the command ship had none...Admiral Callaghan was flying blind. It must be remembered that radar was new and very few knew how to utilize it. Training, on all levels about Radar was woefully lacking. Japan's Vice Admiral Abe, had under his command, two battle ships (BB's) Kirishima and Hiei (14-inch guns) one CL the Nagara, and 11 DD's Samidare, Murasame, Asagumo, Teruzuki, Amatsukaze, Yukikaze, Ikazuchi, Inazuma, Akatsuki, Harusame, and Yudachi . His flag was flying in the BB Hiei, at the tail end of his column's. Due to rain squalls, Admiral Abe,being ahead of schedule, turned his ships around and headed away from Guadalcanal. When turning around, he found he had a mess on his hands and never got it straightened out before the battle commenced. He also was not expecting to find any opposition against him. His ships were equipped with shells for bombardment not against ships. He more or less had four columns way in the forefront. This is not what he had in mind. At about 0125 hours on 13 November, in near-complete darkness because of the bad weather and dark moon, the ships of the Japanese force entered the sound between Savo Island and Guadalcanal and prepared to bombard Henderson Field. Several of the US ships detected the Japanese ships on radar, beginning about 0124 hours, but had trouble communicating the information to Callaghan because of problems with their radio equipment and lack of discipline regarding their communications procedures. Several minutes later, both forces visually sighted each other almost simultaneously, but both Adml Abe and Callaghan hesitated ordering their ships into action. Adml Abe was surprised by the proximity of the US ships and could not decide if he should withdraw to give his battleships time to change from bombardment ammunition to anti-ship ammunition or to continue onward. He decided to continue onward. Callaghan apparently intended to the cross the T of the Japanese, as Scott had done earlier at Cape Esperance fight, but confused by the incomplete information he was receiving, plus the fact that the Japanese formation now consisted of several scattered groups - he gave several confusing orders on ship movements. The US ship formation began to fall apart also, apparently further delaying Callaghan's order to commence firing as he first tried to ascertain and align his ships. Meanwhile, both formations began to intermingle with each other as the individual ship commanders on both sides anxiously awaited permission to open fire. The lead DD Cushing made an abrupt left turn to avoid ramming the DD Yudachi. Everyone was surprised and from then on it was like a"bar room brawl" as one survivor related. The USS Atlanta had to abruptly turn to port as it was about to ram the stern of the DD O'Banon. This exposed the Atlanta and bathed in a searchlight from the Akatsuki, Japanese guns began to fire on her at 0148 hours. Admiral Norman Scott's flagship, was the first to catch the shells and torpedoes, and even before Admiral Callaghan gave the order to "commence fire", one torpedo (possibly two) pierced the hull, "lifting her bodily from the water , then set her down shuddering and crippled. Shortly after the torpedos hit, a salvo of 14-inch gun shells struck killing Admiral Scott and all hands but Capt. S. P. Jenkins, Ens. Graff, and Stewart Moredock who were on the bridge. Capt. Jenkins was wounded in the foot, Graff and Moredock were wounded more seriously but survived. . It was estimated that 30 shells hit the superstructure. In some instances, ships passed withing 20 feet of the Japanese ships. All ships were intermingled. The Battle was fierce and short, only 40 minutes long. Captain Gilbert Hoover, of the Helena, and surviving senior officer ordered disengagement. LtJG. Donald Spangler was the Radio Traffic Officer in the radio room located just below the bridge. From the records found so far and have been able to obtain, All hands but one was killed. Those killed were LtJG Donald Spangler, RM3c Robert Corson, RM2c Ralph Jordan, RM3c Frank Liguz, RM1c Freaderick Mayo, RM1c Russell Munday, RM3c Pearse O'Moore, RM2c Ralph Warner, RM3c Charles Weil, and RM3c William Wilson, There may have been others, but from the available ships company list, those were listed. Not on the list was Lt. Currier, who the DE700 was named after, he was a Communications Officer and new on board just before sailing from Noumea. Those that survived are, RM3c Homer Duke, RM2c Herbert Pickett, RM3c Henry Powell, RM1c Raymond Tomkowski. and RM3c William Vance. I will go out on a limb and say that those that survived were at their battle stations in the transmitter room and emergency radio room which were separated some distance from the main Radio Room and Traffic Center. The Atlanta took a beating. It looks like that all the big guns were aimed right at her. She was spotted by a searchlight, which was a favorite of the Japanese to use since they did not have any radar. With the pounding she took, with shells hitting the engine and fire rooms, and the loss of electrical power, she still fought back, one of her 5-gun mounts had aux power and her 20 and 40 at the close range of 1000 yards or less, kept firing until the "abandon ship"order came through. She still did not sink until late that day when we finished her off. She made a good account of herself...Captain S.P. Jenkins was awarded the Navy Cross for his actions on that night. The ship was awarded the Presidential Unit Citation.; Our losses from the nights engagement was: CL Atlanta, DD's Cushing, Laffey, Barton and Monssen. Heavily damaged were the CA's San Francisco, and Portland, CL's Helena and Juneau, DD's Sterrett, O'Bannon, and Aaron Ward, the DD Fletcher escaped without a scratch, she was "tail-end-Charlie." Japanese losses were, DD Akatsuki, sunk carrying most of her crew with her. Because she had her searchlights on, all our ships fired at her and she sank with in minutes of the battle commencing. . DD's Yukikaze and Yudachi lay dead in the water and later sunk by the Cactus Air Force (an ensemble of Allied air power statioed on Guadalcanal). The battleship Hiei, was a broken hulk, but still put up a fight when the Cactus Air Force attacked and disposed her. Admiral Abe, because of the severity and ferociousness of the attack by our Naval Forces, put his tail between his legs and ran. He left the transports to shift for themselves and the Cactus Air Force disposed of most of them. Not many troops or supplies reached shore. The battle for Guadalcanal then turned in our distinct favor and we won control, not only the land area but in the sky as well. Japan sent fast DD's to the island not to land material and men but to evacuate them. It is also of note that in North Africa and in Russia, at about the same time the Allies began the offense against Germany, Italy and the other Axis powers. From that month on, the Allies, on all fronts were on the offense and never stopped until the enemy surrendered in May and August 1945. The month of November was a significant month in both theaters of War. Those who gave their lives contributed more than what they ever realized. We salute all our fallen comrades for their sacrifice also their families and loved ones, we humbly say thank you.
|